nt_helper
Table of contents
- Helper for Disting NT Preset Editing
Helper for Disting NT Preset Editing
Introduction
I got a Disting NT, read through the manual, and decided one day to see whether I could write a program to implement the SysEx protocol. Nearly immediately, I was able to get messages flying between a Flutter application and the Disting NT, and this project began. Using Flutter, I thought I'd be able to support a wide range of platforms quite easily, and that has been true so far.
This project supports Windows desktop, Linux, and macOS, as well as iOS and Android.
Installation
For Windows, Linux, Android, and macOS, download the appropriate file from the releases on GitHub and install it. For macOS, the app is registered with Apple on each build, and code signed so that you can more easily install it from the archive.
TestFlight builds are no longer being made. iOS users should install nt_helper from the App Store, and macOS users should install the GitHub release build.
- iOS: App Store
- Android, Windows, Linux, macOS: GitHub Releases
Troubleshooting
If you find the app is not starting on Windows, please download the C++ libraries from Microsoft from this URL: Latest Microsoft Visual C Redistributable Version
Features
The features of nt_helper follow those of the Expert Sleepers preset editor since they are built on the same protocol. nt_helper differs in a few ways, mainly in its tab layout (instead of indexed slots, you see all of the algorithms in a preset).
nt_helper has a light theme, and a dark theme, depending on what the system is configured to it will adapt.
Connecting to Disting NT
You will need to directly wire, via USB-C, the Disting NT and the device you are running nt_helper on. Some iOS devices require a Lightning to USB-C adapter to do this, but most modern devices can use a USB-C cable directly.
The initial screen you will see is the device selection screen. Select your Disting NT's MIDI input from the dropdown. A compact refresh icon button next to the dropdown lets you rescan for devices.
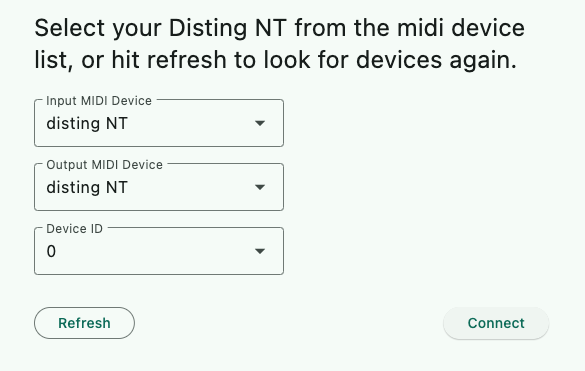
The main action is a split button: the primary side shows Connect when a device is detected or Offline when no device is available. A dropdown arrow on the split button provides access to both options. On desktop, when a Disting NT is detected, a Firmware button also appears beside the split button for quick access to firmware updates.
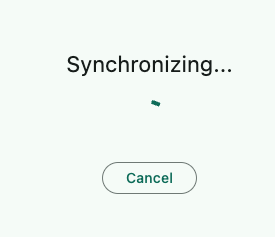
Synchronizing
You will see a screen that shows the initial synchronization spinner. This should only take a short period of time. If it spins indefinitely, you likely have an issue with MIDI, such as cable length or another problem. Try a shorter cable. Try a different cable. Then contact me for help. Synchronization should not take long, but sometimes timeouts and retries occur if the devices are slow or the cable connection is poor. If necessary, Cancel and try connecting again.
You may need to modify the default settings for message timeouts and inter-message delays. See the Settings section below for details. The settings icon appears on the connection page, and so when you cancel, you can edit the settings if you need to.
Connection Stability
nt_helper includes several features to maintain a stable connection:
- MIDI Stream Auto-Recovery: If the MIDI communication stream becomes corrupted (which can happen with long USB cables or hub issues),
nt_helperautomatically detects and recovers from the corruption without requiring a manual reconnect - USB Video Recovery: For devices that support USB video display (screenshot streaming), exponential backoff and stall detection help recover from temporary video stream interruptions
Working Offline
nt_helper provides an offline mode that allows you to manage and edit presets even when not actively connected to your Disting NT. This is useful for preparing presets on the go, organizing your preset library, or working when your module isn't immediately available.
Key Features of Offline Mode:
- Accessing Offline Data:
- When
nt_helperis in offline mode (either because no MIDI connection could be established, or by manually choosing to work offline), the bottom app bar on the main editor screen will display an "Offline Data" button (sync icon). - Tapping this button takes you to the Offline Data Management screen.
- When
- Offline Data Management Screen:
- Toggle Online/Offline: An icon button (Wi-Fi on/off) allows you to switch between attempting a live connection and working purely offline.
- Browse Local Presets: View a list of presets that have been saved to the app's local storage with smooth, flicker-free navigation.
- Load Preset for Offline Editing: Select a locally saved preset to load it into the main editor. You can then modify its algorithms, parameters, and mappings as if you were online. These changes are initially only in the app's working memory for the offline session.
- Save Preset to Local Storage: After editing a preset offline, you can save it (or save a new offline preset) to the local database.
- Send to NT (When Online): If you later connect to your Disting NT, you can use this screen to send a locally saved preset directly to the device.
- Scan SD Card Presets: A new option (e.g., a 'Scan SD Card' button) allows you to scan your connected SD card for preset files (
.json). The app builds a local database of these presets, including their names and file paths. This database is then used to provide a searchable list when loading presets, making it much easier to find and manage presets stored on SD cards.
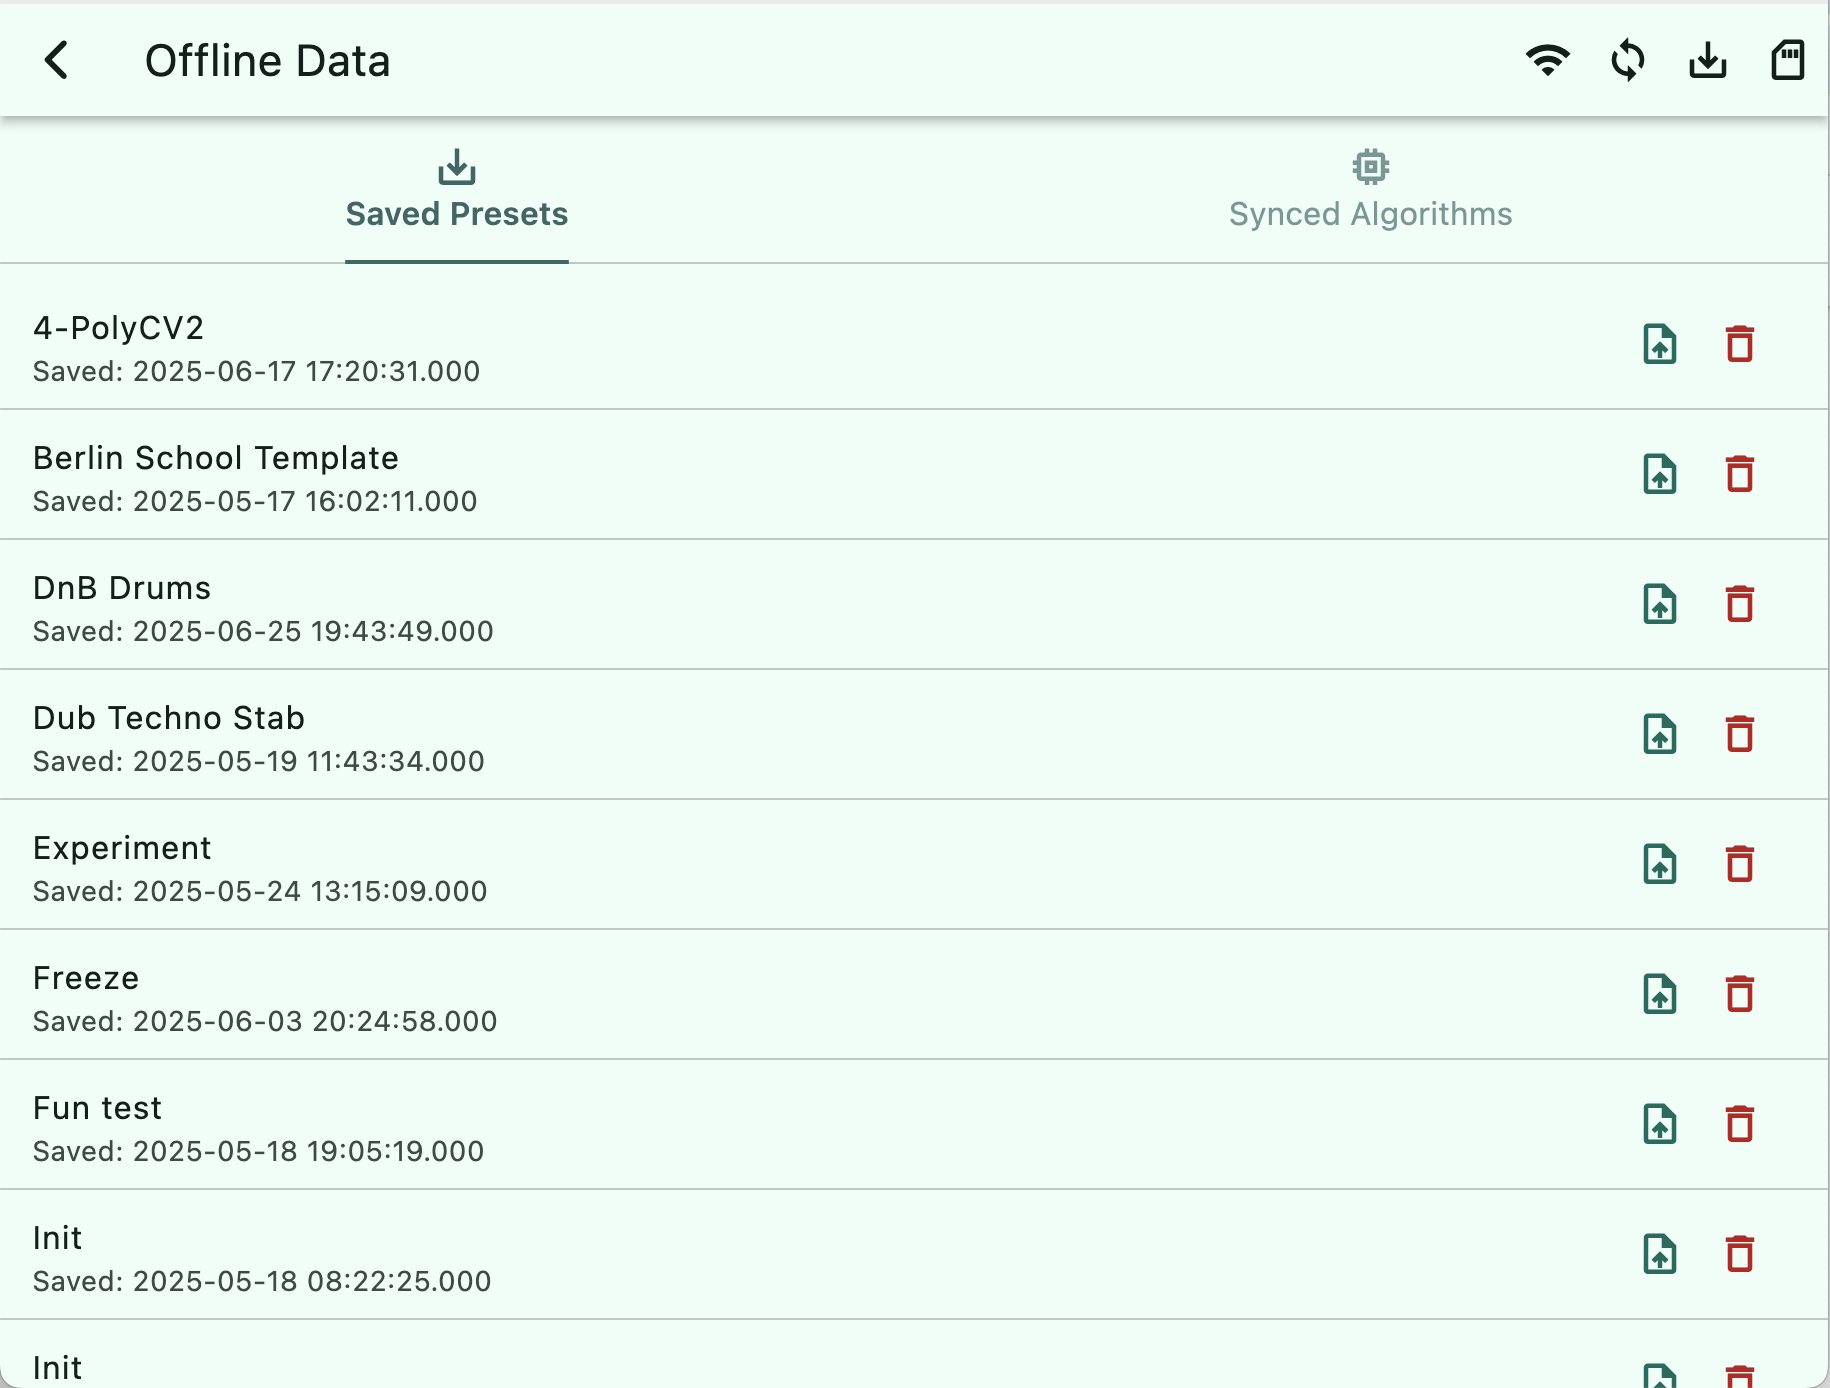
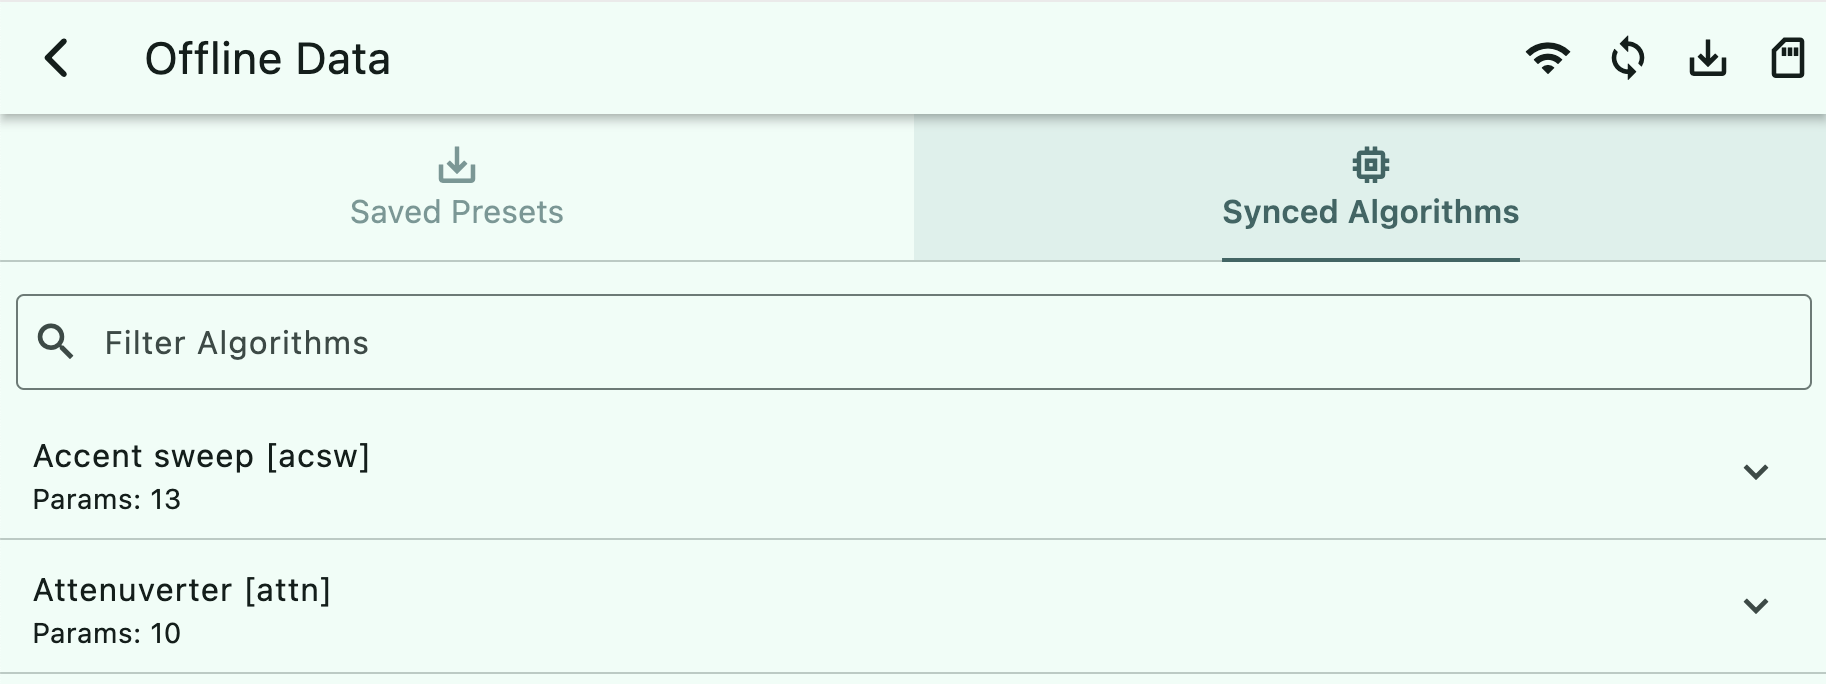
- Synced Algorithms Tab: Browse cached algorithm specifications with search functionality for offline reference.
- Editor Screen in Offline Mode:
- Most editing functions (adding/removing algorithms, changing parameters, editing mappings, renaming slots/presets) work similarly to online mode.
- When adding new algorithms,
nt_helperuses their default specifications as defined in its metadata. - Features requiring direct communication with the module (e.g., Refresh, Wake, Screenshot, Perform, Routing, loading presets from the device) are disabled.
- Automatic Offline Availability: If
nt_helpercannot connect to a Disting NT on startup (e.g., no MIDI devices found or connection fails), it will offer the option to work offline if cached algorithm metadata is available.
This offline capability ensures you can still be productive with your presets and ideas, regardless of your immediate connection status to the Disting NT.
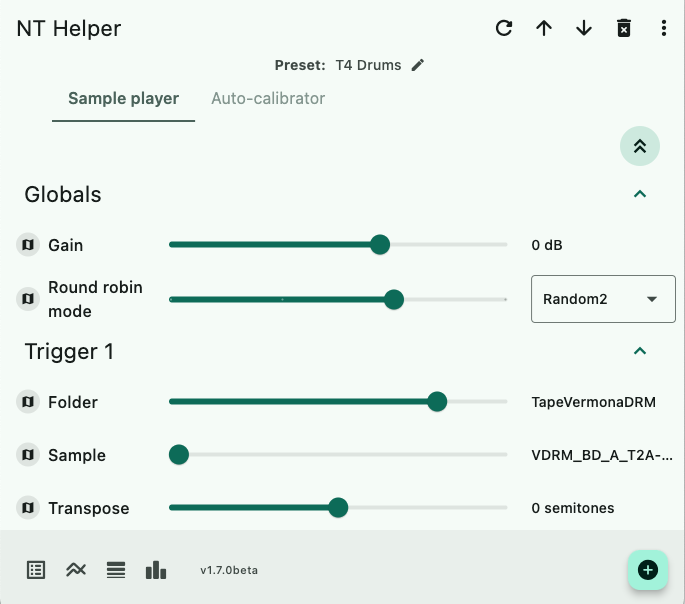
Editor Screen
The editor screen consists of several sections, each described below.
Top App Bar
This app bar shows the app title, actions, overflow menu, and preset name.
Actions
You can refresh, delete an algorithm and move algorithms up and down (back and forth in the tab bar). Algorithms that are further left are higher in the algorithm list on the module. The order sometimes matters for signal processing.
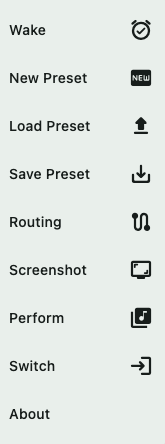
Overflow Menu
Options in the overflow menu include:
- Wake — Wakes up the Disting NT if the screen saver has kicked in.
- New Preset — Creates a new preset. If the current preset contains any algorithms, a confirmation dialog will appear. This dialog offers options to Save First & New (saves the current preset, then creates a new one), Discard & New (clears the current preset without saving, then creates a new one), or Cancel (closes the dialog and takes no action). If the preset is empty, it proceeds to create a new preset directly without confirmation.
- Load Preset — Opens the enhanced preset browser with multiple loading options:
- Three-Panel Browser (Desktop): Miller columns navigation showing folders, files, and preview
- Mobile Browser: Optimized single-column view with drill-down navigation
- Path Persistence: The browser remembers your last visited directory and restores it (including the full panel context) each time you reopen it
- Search: Find presets by name from SD card scans
- Drag & Drop (Desktop): Drop
.zippackages or.jsonfiles directly onto the dialog - Export Function: Export presets directly from the browser
- Save Preset — Saves the preset.
- Routing Editor — Opens the interactive Routing Editor with visual node-based routing.
- Video — Opens a draggable, resizable floating overlay showing a live video feed of the Disting NT's display. Long-press the image to copy the current frame to clipboard. Below the video, a toolbar provides display mode buttons to control what the module shows on its screen (Parameter View, Algorithm UI, Overview, VU Meters). The toolbar auto-hides after a few seconds and reappears when you interact with the overlay. (On Android, video streaming is not currently supported.)
- Perform — Displays a page with all of your mapped parameters all on one page, see the section below.
- Plugin Manager — Opens the Plugin Gallery for managing and installing plugins.
- Switch — Switches your MIDI channels or SysEx ID to another Disting NT.
- Settings — Show the settings dialog.
- Offline Data — Access offline preset management and cached algorithm data.
- Firmware — Opens the Firmware Update dialog (desktop only). See the Firmware Update section below.
- About — Displays application information, version, and Disting firmware details.
Preset Name
Displays the preset name. Tapping it opens a dialog to edit or change the name.
Tab Bar
Tabs display each algorithm in the preset and can be scrolled horizontally. Long-press a tab to rename the algorithm, which will also update the name on the module.
Algorithm Window
The Algorithm window displays a custom widget (e.g., Notes algorithm) or a list of parameter pages. Each parameter row includes:
- Collapse/Expand all Button — A button on the top right of the editor screen gives you access to a way to collapse all of the parameter pages, or expand them all. This makes it easier to find the categories you want to expand instead of having to scroll around to find them.
- Menu - Contains a macro that allows you to reset all of the outputs in the algorithm to a specific value. This is useful on algorithms with a lot of outputs that you don't need, you can set them all to
NoneorAux8. - BPM Editor — For parameters representing Beats Per Minute (BPM), a specialized editor widget is displayed in BPM columns instead of the standard slider, allowing for easier tempo entry. This widget permits direct numerical input of the BPM value, respecting the parameter's minimum and maximum limits. Additionally, it features '+' and '-' buttons for fine-grained adjustment, allowing you to change the tempo by 1 BPM at a time. Changes are sent to the Disting NT in real-time.
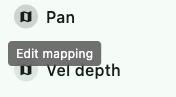
- Mapping Icon — Edit mappings for CV, MIDI, and I2C via a bottom sheet. The MIDI editor allows monitoring of connected MIDI devices to detect and capture CC messages for quick mapping.
- Parameter Name — Long-pressing sets 'focus' on that parameter on the module. On desktop, double-clicking a parameter name also focuses the Disting NT's display on that parameter.
- Original Name Subtitle — When an algorithm has been renamed, its original factory name appears as a subtle subtitle beneath the custom name so you can always identify the underlying algorithm.
- Parameter Value Slider — Double-tap to reset to default, or adjust to a new value. Measures are taken to prevent flooding the module with excessive messages. Haptic feedback will be present when you move the sliders, if you have it enabled in the settings. Percentage parameters display as percentages without MIDI note names.
- Parameter String, Enum, and Unit Section — If the parameter is a file name (e.g., a sample), long-pressing enables
+and-buttons instead of a slider for one-by-one selection. Long-press again to revert to the slider. Channel-prefixed parameters properly preserve their prefixes during synchronization. - Enum Selectors — Many parameters feature drop-down lists of options. Mode parameters that control multiple outputs are properly detected and handled.
- Disabled Parameters — Some parameters are conditionally disabled based on the current mode or configuration of the algorithm. Disabled parameters appear grayed out and cannot be edited until the relevant mode is changed. This reflects the actual state on the module and prevents editing parameters that have no effect in the current configuration.
Mapping
When the mapping icon is pressed, a bottom-sheet will slide up to allow you to edit mappings for CV, MIDI, I2C, and Performance page assignments. The editor is organized into four tabs.
CV Mapping
The CV tab configures how a CV input controls the parameter.
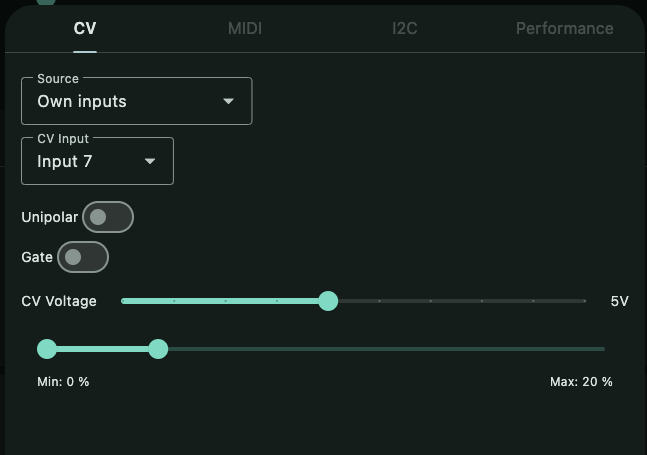
- Source — Select which slot's inputs to use, or "Own inputs" / "Module inputs".
- CV Input — Choose the physical input (Input 1–12, Output 1–8, or Aux 1–8).
- Unipolar / Bipolar — Toggle between unipolar (0V to +V) and bipolar (-V to +V) CV response.
- Gate — Enable gate mode for on/off behavior.
- CV Voltage — A slider (1–10V) specifying the reference voltage your CV source sends. This is the voltage at which the full parameter range is reached.
- Range Slider — Set the effective parameter range using a range slider. Dragging the thumbs previews the parameter value on the module in real-time. For unipolar mode, the full range is applied from 0V to the reference voltage. For bipolar mode, the range is centered around the current value, with half the range applied in each direction.
MIDI Mapping
The MIDI tab configures how MIDI messages control the parameter. A range slider sets the parameter range, with real-time preview during drag.
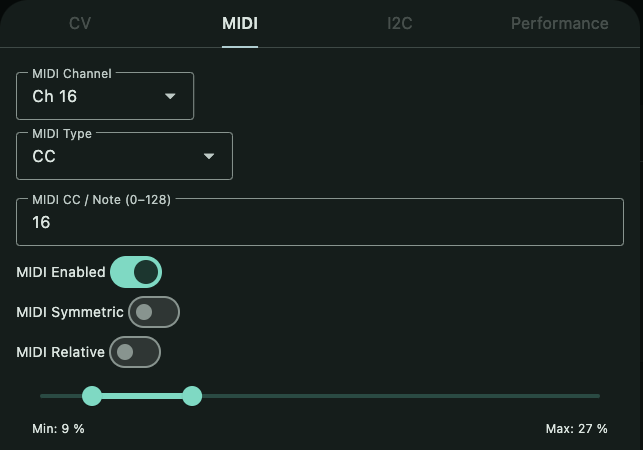
The MIDI mapping editor supports several mapping types:
- CC — Standard 7-bit MIDI Control Change messages (0-127 values).
- Note - Momentary — Map to MIDI note on/off messages with momentary behavior.
- Note - Toggle — Map to MIDI note messages with toggle behavior.
- 14 bit CC - low — High-resolution 14-bit MIDI CC using two controllers. This is the LSB (Least Significant Byte) controller.
- 14 bit CC - high — High-resolution 14-bit MIDI CC. This is the MSB (Most Significant Byte) controller.
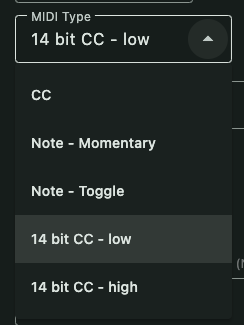
14-bit MIDI CC provides 16,384 discrete values instead of the standard 128, eliminating zipper noise and enabling smooth parameter sweeps. This is particularly useful for parameters like filter cutoff, pitch, or any parameter that benefits from fine control. When using 14-bit CC, configure both the low and high controllers as a pair, with the low controller number typically 32 higher than the high controller number (e.g., CC 1 for high, CC 33 for low).
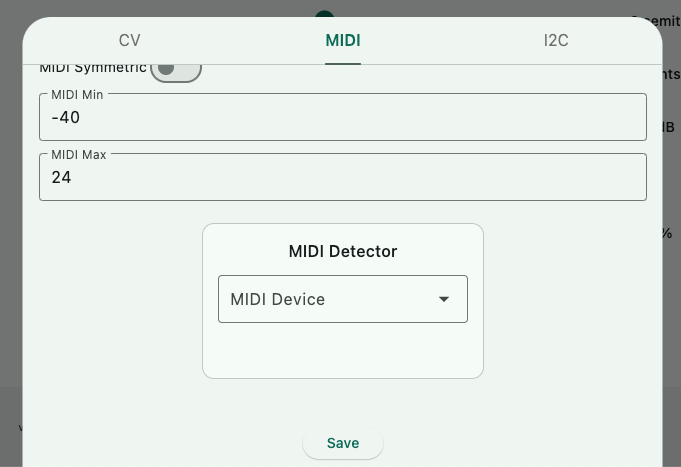
MIDI Detector
There is a somewhat hidden feature in the MIDI mapping editor, where if you scroll it to the bottom, you will see a MIDI Detector box. You can connect to any of the MIDI connections attached to your device, and it will monitor the MIDI CC messages, and automatically fill in the Channel and CC fields for you when it detects a sufficient number of incoming messages that are the same. This makes it quite a bit easier to perform MIDI mapping with nt_helper.
I2C Mapping
The I2C tab works the same way as MIDI — set the CC number, enable it, and use the range slider to define the parameter range with real-time preview.
Autosave
Mapping changes are saved automatically. A small indicator dot appears next to the tabs: amber while you have unsaved changes, blue while saving. The indicator clears once the save completes. If you dismiss the editor before the save timer fires, any pending changes are flushed immediately.
Bottom App Bar
The bottom app bar provides quick access to editing modes, frequently used features, and status information.

Mode Switcher
On the left side, a segmented button toggles between editing modes:
- Parameters (Ctrl/Cmd+1) — Edit algorithm parameters in a list view
- Routing (Ctrl/Cmd+2) — Open the visual routing editor canvas
- Split-Screen (Ctrl/Cmd+3) — Show Parameters and Routing side by side (desktop only, requires 800px+ width)
Quick-Action Buttons
Next to the mode switcher, quick-action buttons provide one-tap access to frequently used features:
- File Browser (Ctrl/Cmd+O) — Opens the preset browser to load presets from the SD card. Disabled when offline.
- Perform — Opens the Performance screen with all mapped parameters on one page.
- Plugin Manager — Opens the Plugin Gallery for managing and installing plugins.
When working offline, an Offline Data button appears, providing access to cached presets and algorithm metadata.
Status Indicators
On the right side of the bottom bar:
- MCP Status (desktop only) — Green dot indicates the MCP server is active
- Firmware Version (tablet/desktop) — Shows the connected Disting NT firmware version. Tap to open the Firmware Update dialog (desktop only)
- CPU Monitor (wide screens) — Shows current CPU usage on the module
Contextual Help Bar
A contextual help bar appears above the bottom app bar when you interact with certain elements, providing guidance on available actions:
- Algorithm Name: When you long-press an algorithm tab to rename it, the help bar explains the available gesture
- Firmware Version: When you tap the firmware version, the help bar explains that tapping opens the firmware update dialog
Add Algorithm Button
The floating action button on the right opens the Add Algorithm screen to add new algorithms to your preset.
Split-Screen Mode
Split-screen mode displays the Parameter editor and Routing editor side by side, allowing you to see and edit both simultaneously. This mode is available on desktop platforms when the window is at least 800 pixels wide.
Activation: Select both Parameters and Routing on the segmented button in the bottom app bar, or press Ctrl/Cmd+3.
- Draggable Divider — A vertical divider separates the two panes. Drag it to resize; each pane has a minimum width of 500 pixels. Your divider position is saved and restored across sessions.
- Bidirectional Selection Sync — Selecting an algorithm tab in the Parameters pane automatically focuses the corresponding node in the Routing pane, and vice versa. The routing view auto-centers on the focused node with a smooth animation.
- Parameter Page Navigation — Press bare digit keys 1–9 to jump to parameter pages 1–9, or 0 for page 10. These shortcuts work in both Parameters mode and Split-Screen mode (they are ignored when a modifier key is held).
MCP Server Integration
nt_helper includes an MCP (Model Context Protocol) server, primarily for desktop platforms (Windows, macOS, Linux). This server allows external tools and AI assistants (like Cursor) to interact with the application programmatically, enabling advanced workflows and automation. MCP is an open protocol that standardizes how applications provide context to LLMs. You can learn more about it at the Model Context Protocol website.
- Status Indicator: A small LED-like indicator is present on the bottom app bar (on desktop versions).
- Green: Indicates the MCP server is active and listening on
http://localhost:3000. - Grey: Indicates the server is disabled.
- Green: Indicates the MCP server is active and listening on
- Toggling the Server: You can enable or disable the MCP server in two ways:
- Through the Settings dialog (see "Settings" section below).
- By directly clicking the status indicator on the bottom app bar.
- Enhanced Capabilities: Recent updates include:
- CPU Usage Monitoring: External tools can monitor per-core and per-slot CPU usage on the Disting NT
- Improved Connection Stability: Extended session timeouts and comprehensive recovery mechanisms for long-running connections
- Enhanced Algorithm Search: Fuzzy matching for algorithm categories, making it easier for AI tools to locate algorithms by partial category names
- Purpose: When enabled, tools can send commands to
nt_helperto perform actions like loading presets, adding algorithms, setting parameter values, monitoring performance, and more, facilitating scripted interactions or AI-driven preset design. - Available Tools: The MCP server exposes five tools:
search(find algorithms),new(create presets),edit(modify slots and parameters),show(display current state), andremove(delete slots from a preset).
AI Chat Assistant
On desktop platforms, nt_helper includes a built-in AI Chat Assistant accessible as a resizable side panel. Toggle it with Cmd/Ctrl+L or from the toolbar.
- Supported Providers — Choose between Anthropic (Claude) or OpenAI as your AI provider. Configure API keys in the Settings dialog, or use Anthropic's subscription-based authentication (no API key needed).
- Preset Building — The assistant connects to nt_helper's MCP tools, so it can search for algorithms, add or edit slots, adjust parameters, and build presets conversationally.
- Persistent Memory — Chat context persists across sessions, so the assistant remembers previous conversations and preferences.
- Resizable Panel — Drag the panel edge to adjust its width. Copy individual messages to clipboard with a single click.
Keyboard Shortcuts
nt_helper provides keyboard shortcuts on desktop platforms. Press Ctrl/Cmd+/ at any time to display the shortcut help overlay.
Global Shortcuts
| Shortcut | Action |
|---|---|
| Ctrl/Cmd+S | Save Preset |
| Ctrl/Cmd+N | New Preset |
| Ctrl/Cmd+O | Browse Presets |
| Ctrl/Cmd+Shift+N | Add Algorithm |
| Ctrl/Cmd+R | Refresh |
| F5 | Refresh (Windows) |
| Ctrl/Cmd+1 | Switch to Parameters mode |
| Ctrl/Cmd+2 | Switch to Routing mode |
| Ctrl/Cmd+3 | Switch to Split-Screen mode |
| Ctrl/Cmd+[ | Previous Slot |
| Ctrl/Cmd+] | Next Slot |
| Ctrl/Cmd+/ | Show Keyboard Shortcuts |
Parameters Mode Shortcuts
| Shortcut | Action |
|---|---|
| 1–9 | Jump to parameter page 1–9 |
| 0 | Jump to parameter page 10 |
These bare digit shortcuts also work in Split-Screen mode. They are ignored when any modifier key is held.
Routing Mode Shortcuts
| Shortcut | Action |
|---|---|
| Ctrl/Cmd+Scroll | Zoom in/out |
| Ctrl/Cmd+Plus | Zoom in |
| Ctrl/Cmd+Minus | Zoom out |
| Ctrl/Cmd+0 | Reset zoom to 100% |
| Arrow keys | Pan canvas |
| Delete/Backspace | Delete selected connection |
| Escape | Cancel connection drag or clear selection |
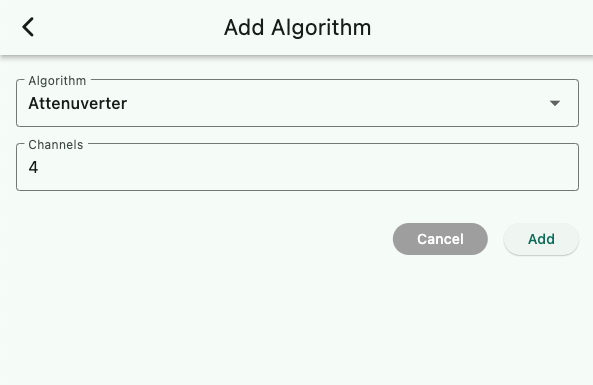
Adding Algorithms
Pressing the Add Algorithm button navigates to the specification screen. Here, you can select an algorithm and configure it before adding it. Synchronization occurs automatically, and the new algorithm appears at the end of the tab bar.
If the algorithm does not appear, use the Refresh menu option to trigger another update.
View Modes
The Add Algorithm screen offers three different view modes to help you find algorithms efficiently. Use the segmented button near the filter controls to switch between modes:
- Chip Grid (default) — Compact chips showing algorithm names, suitable for quick scanning when you know what you are looking for.
- List View — A scrollable list with more detail per algorithm, including category tags and description previews where available.
- Column View — A responsive card grid that shows algorithm names, categories, and indicators. Displays two columns on narrow screens and three columns on wider screens.
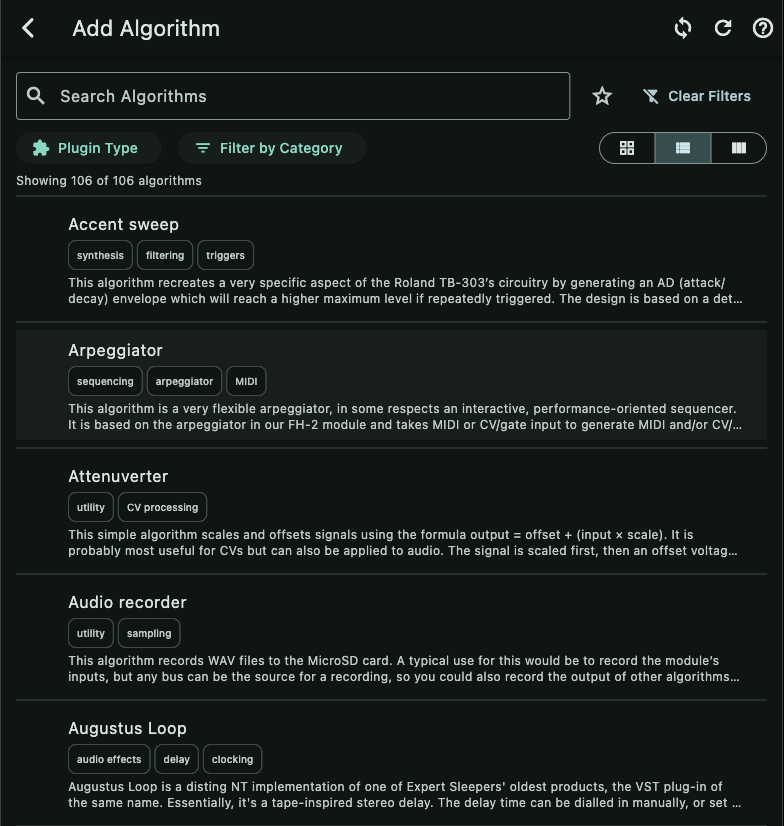
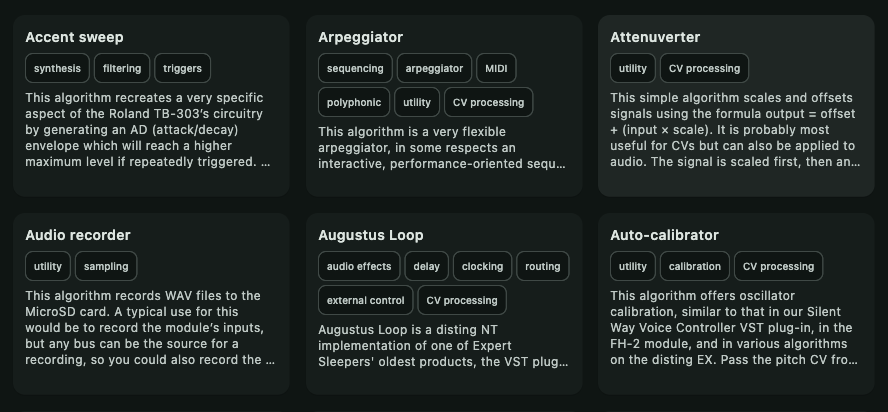
Your selected view mode persists across app restarts. All three views support the same filtering options: search, favorites, plugin type, and categories. An algorithm count is displayed below the filter controls showing how many algorithms match your current filters.
Filtering
Use the filter controls to narrow down the algorithm list:
- Search — Type to filter by algorithm name
- Favorites — Show only algorithms you have marked as favorites
- Plugin Type — Filter by built-in algorithms, Lua scripts, 3pot plugins, or C++ plugins
- Categories — Filter by algorithm category (e.g., Audio, Effects, Sequencing)
Step Sequencer
The Step Sequencer algorithm has a dedicated visual interface in nt_helper that replaces the standard parameter list with an intuitive grid-based editor. When you select a Step Sequencer algorithm in your preset, you will see the visual interface automatically.
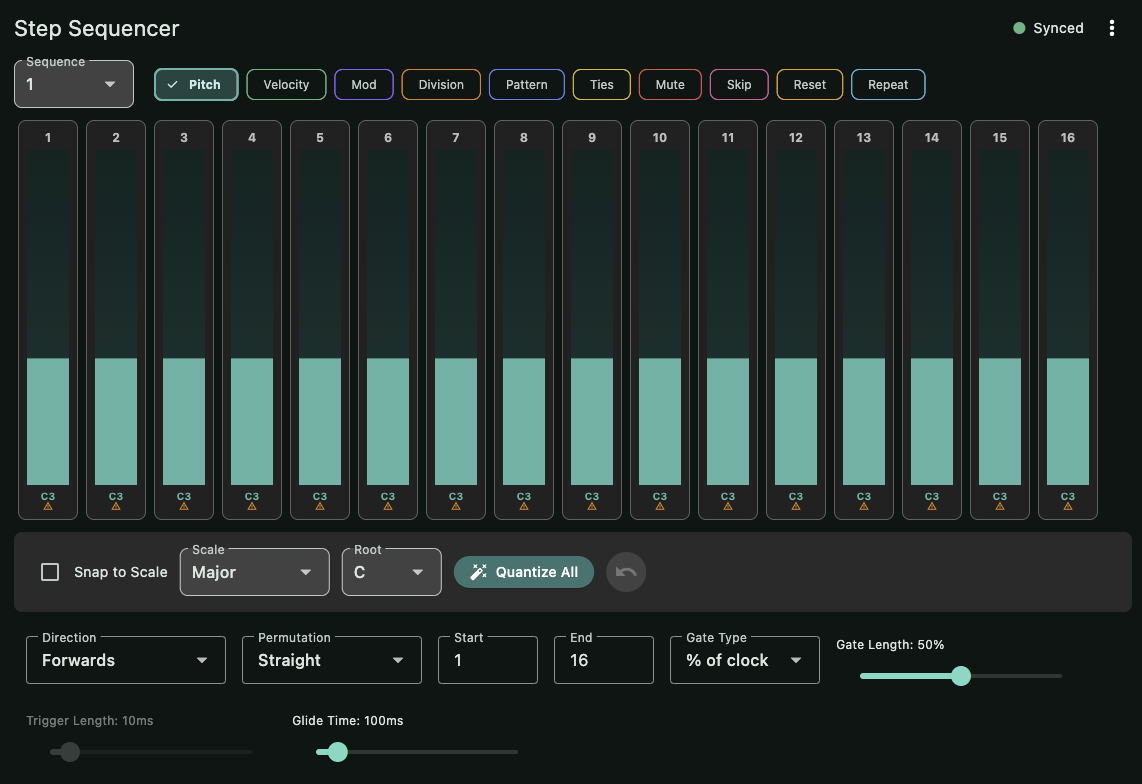
Grid Interface
The main interface displays a 16-step grid where each column represents one step in the sequence:
- Pitch Bars — Vertical bars showing the pitch value for each step. Drag up or down to change the pitch. The height of the bar indicates the relative pitch within the current scale.
- Step Numbers — Each column is labeled with its step number (1-16).
- Visual Feedback — The current playing step is highlighted during playback when connected to the module.
Sequence Selector
At the top of the interface, the sequence selector allows you to switch between the four available sequences (A, B, C, D). Each sequence has its own independent set of step values.
Quantization
The Step Sequencer includes scale quantization to keep your sequences musical:

- Scale Selection — Choose from a variety of scales including Major, Minor, Pentatonic, Blues, Dorian, Phrygian, Lydian, Mixolydian, and more.
- Root Note — Set the root note for the scale.
- Quantize Button — Apply quantization to snap all step pitches to the nearest note in the selected scale.
- Undo — Undo the last quantization operation if needed.
Playback Controls
Below the grid, playback controls allow you to configure how the sequence plays:
- Direction — Forward, reverse, pendulum, or random playback.
- Start/End Steps — Define a range within the 16 steps to loop.
- Gate Length — Adjust how long each gate stays high.
- Glide — Enable portamento between steps.
Per-Step Parameters
Each step can have additional parameters beyond pitch:
- Velocity — Control the velocity or accent of each step.
- Probability — Set the probability (0-100%) that a step will trigger.
- Gate Type — Choose the gate behavior for each step.
Bit Pattern Editors
For Pattern and Ties parameters, dedicated bit pattern editors allow you to toggle individual bits by tapping directly on the pattern display. This provides a quick way to create rhythmic variations and tie patterns.
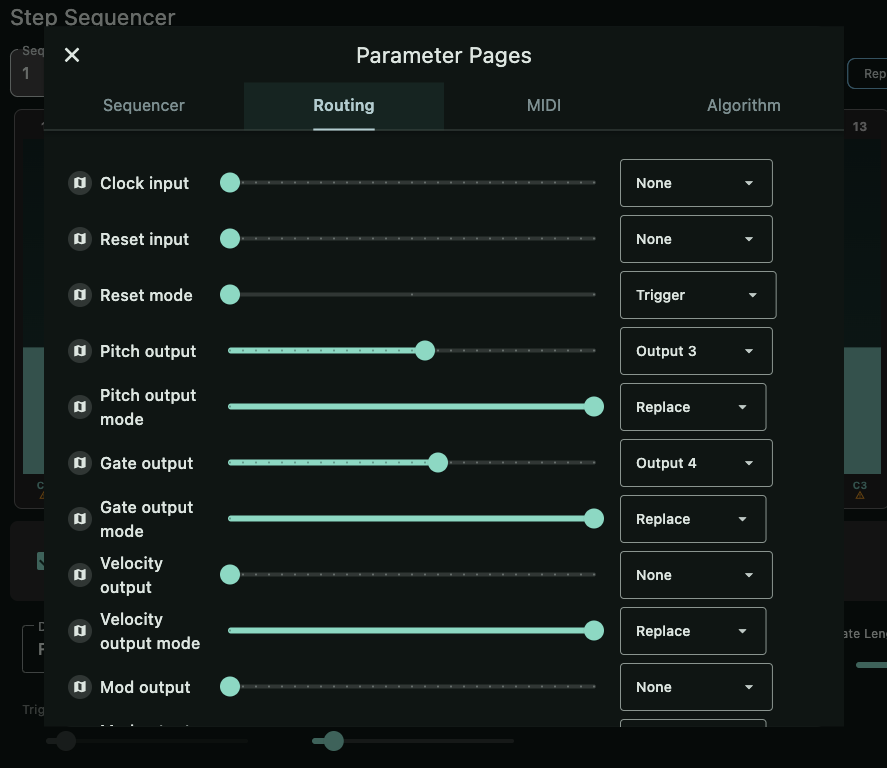
Parameter Pages
For access to all Step Sequencer parameters in the traditional format, use the Parameter Pages view. This displays the familiar expandable parameter sections while still providing the visual context of the step grid.
Randomization
The randomize menu provides options to generate random sequences:
- Randomize Pitches — Generate random pitch values within the current scale.
- Randomize Velocities — Generate random velocity values.
- Randomize All — Randomize all step parameters at once.
- Settings — Configure randomization ranges and constraints.
Sync Status
A sync indicator shows whether your changes have been sent to the module. Changes are automatically synchronized with a short debounce delay to prevent flooding the module with messages while you are actively editing.
Offline Support
The Step Sequencer visual interface works in offline mode. You can edit sequences without a connected module, and changes will be tracked for later synchronization when you reconnect.
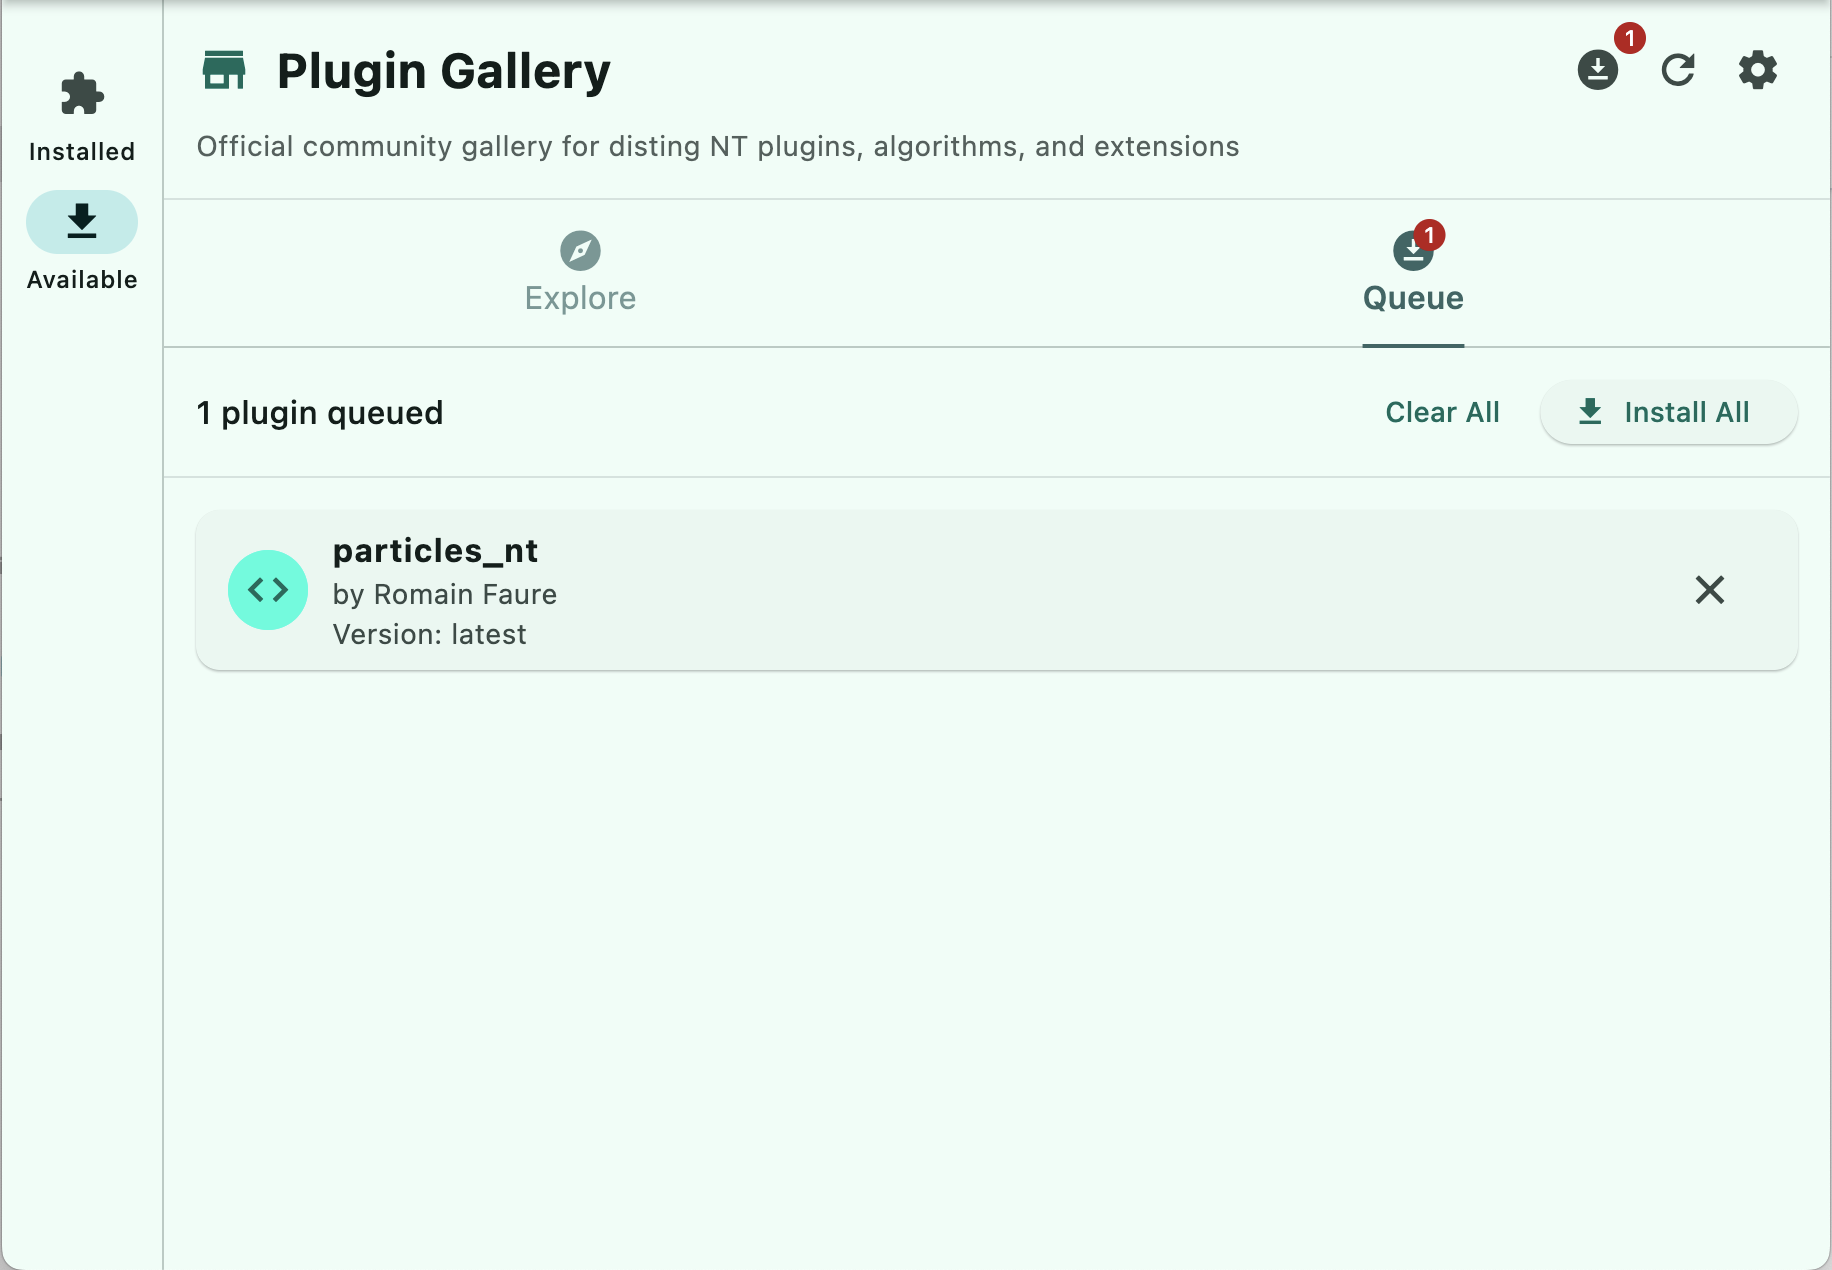
Plugin Gallery
nt_helper includes a comprehensive Plugin Gallery for discovering, managing, and installing plugins for your Disting NT. Access the Plugin Gallery through the overflow menu by selecting Plugin Manager.
Plugin Manager Interface
The Plugin Manager provides two main views:
Installed Plugins Tab
- View by Type: Plugins are organized into collapsible sections: Lua Scripts, 3pot Plugins, and C++ Plugins
- Plugin Details: Each plugin shows name, path, file size, and modification date
- Management Actions:
- Info — View detailed plugin information
- Delete — Remove plugins with confirmation dialog
- Backup — Create complete backups of all installed plugins (desktop only)
- Manual Installation: Install plugin files (
.lua,.3pot,.o) directly from your computer (desktop only)

Plugin Gallery Tab (Available)
- Browse Plugins: Discover community-created plugins from a curated gallery
- Search & Filter: Find plugins by name, category (Audio, Effects, Sequencing, etc.), type (Lua, 3pot, C++), or featured status
- Plugin Information: View descriptions, authors, ratings, and compatibility details
- Queue System: Add plugins to an installation queue for batch processing
- View Modes: Switch between different browsing layouts to suit your preference
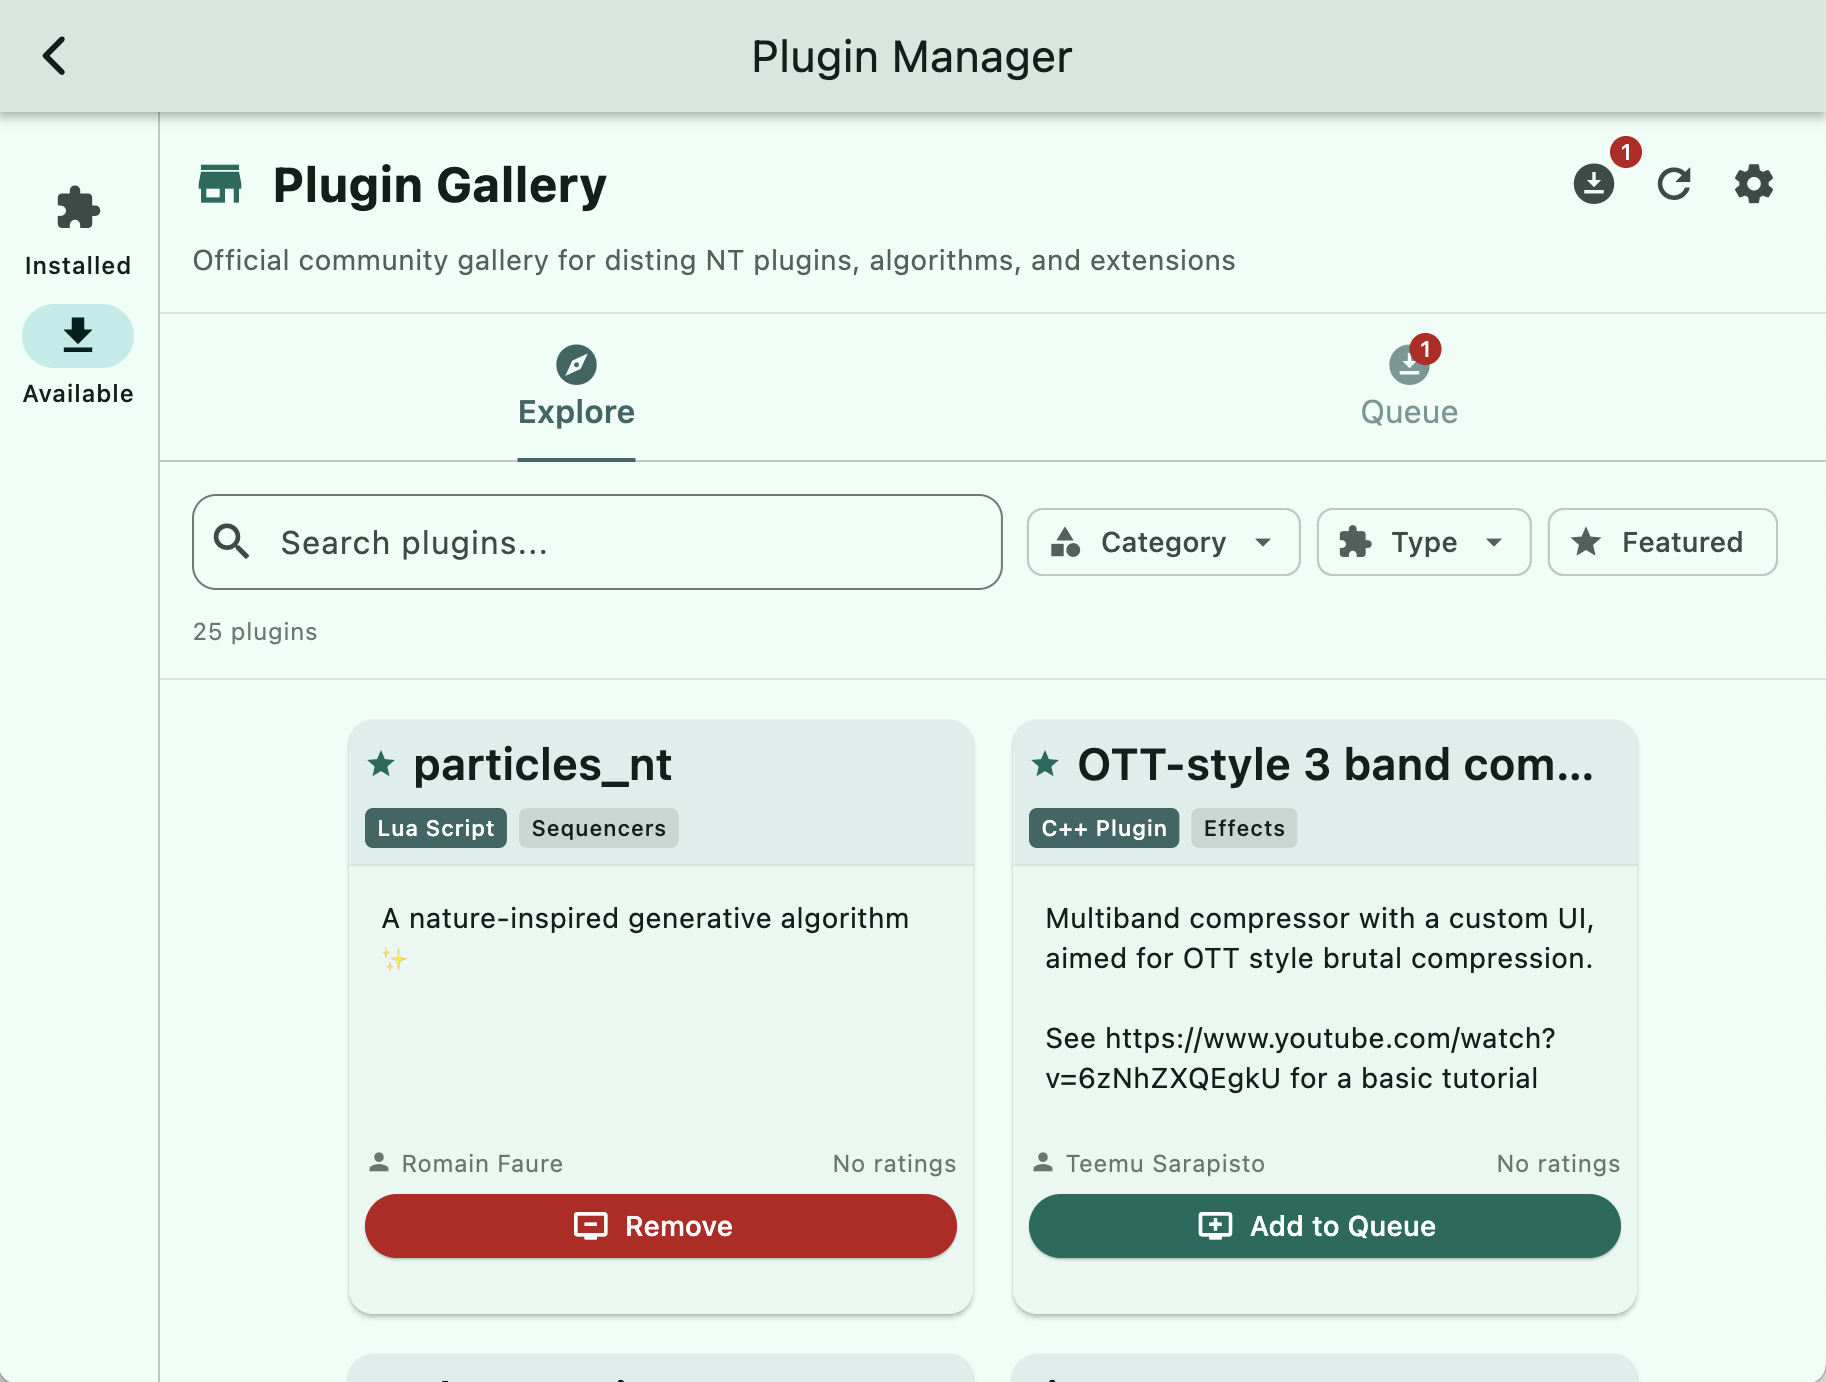
View Modes
The Plugin Gallery offers multiple view modes accessible via the view mode selector:
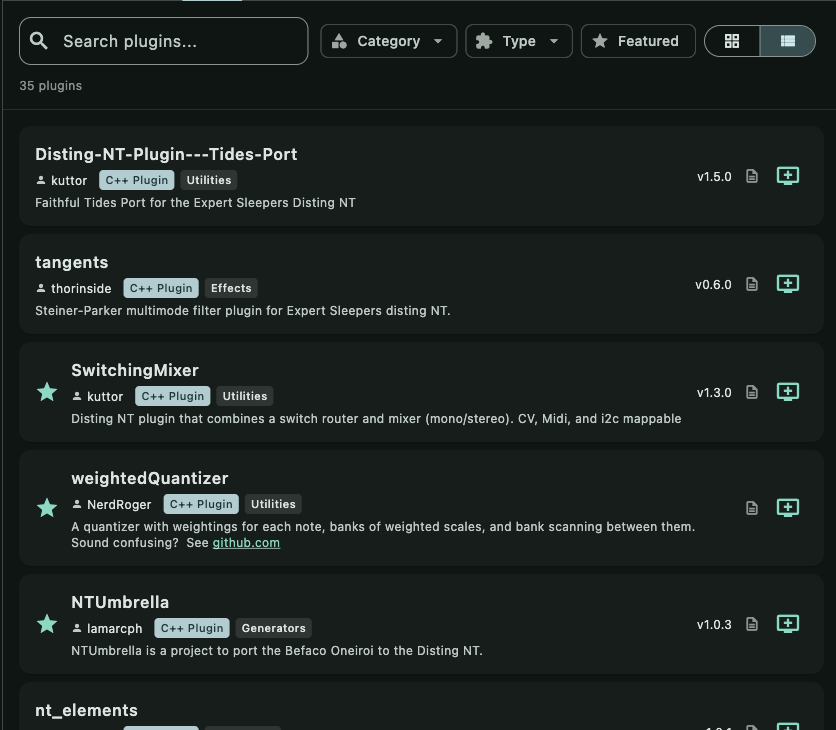
- Grid View — Compact cards showing plugin names and key information
- List View — Detailed list with descriptions and metadata
- Clickable URLs — Plugin cards with external links open in your browser when clicked
Installation Process
From Gallery:
- Browse or search for plugins in the Gallery tab
- Add desired plugins to your installation queue
- For plugin collections, choose specific plugins to install via the selection dialog
- Install all queued plugins with progress tracking
- Plugins are automatically transferred to your Disting NT's SD card
- Lua Scripts and Three Pot plugins are handled gracefully during program changes
- Sample Dependencies: When installing plugins that require sample files (e.g., drum machines, samplers),
nt_helperautomatically detects and offers to install the required samples alongside the plugin
Direct Installation (Desktop):
- File Picker: Use the + button to select plugin files from your computer
- Drag & Drop: Drop plugin files directly onto the Gallery for instant installation
- Supports
.lua(Lua scripts),.3pot(3pot plugins), and.o(C++ plugins)
C++ Plugin Installation:
C++ plugins (.o files) require special handling because the Disting NT needs to rescan its plugin directory after installation. When you install a C++ plugin:
- The plugin file is transferred to the
programs/plug-ins/directory on the SD card nt_helperautomatically triggers a plugin rescan on the module- The module reloads its plugin list to include the newly installed plugin
- The new algorithm becomes available in the Add Algorithm screen
This automatic rescan eliminates the need to manually power cycle or navigate menus on the module after installing C++ plugins.
Plugin Backup (Desktop Only)
Create comprehensive backups of your installed plugins:
- Choose Location: Select existing folder or create new backup directory
- Maintains Structure: Preserves original directory organization (
programs/lua/,programs/three_pot/,programs/plug-ins/) - Progress Tracking: Real-time backup progress with file-by-file status
Preset Package Installation
On desktop platforms, nt_helper supports installation of preset packages through drag-and-drop functionality. This feature streamlines the process of installing community-created preset collections.
Supported Formats:
- ZIP Packages — Preset packages containing multiple files with a
manifest.jsonfile - JSON Files — Individual preset files
Installation Process:
- Drag a
.zippackage or.jsonpreset file onto the Load Preset dialog - For ZIP packages,
nt_helperanalyzes the contents and validates the manifest - If file conflicts are detected (files already exist on your SD card), a conflict resolution dialog appears
- Choose actions for each conflicting file: Overwrite, Skip, or Rename
- Files are transferred to your Disting NT's SD card with progress tracking
Conflict Resolution: When installing packages, nt_helper checks for existing files and provides file-by-file conflict resolution options, ensuring you maintain control over your existing preset library while adding new content.
Firmware Update
Starting with version 2.0.0, nt_helper can update your Disting NT's firmware directly from the application on desktop platforms (Windows, macOS, Linux). This eliminates the need to manually download firmware files and use separate flashing tools.
Accessing Firmware Updates
There are two ways to access firmware updates:
- Overflow Menu: Select Firmware from the overflow menu to open the Firmware Update dialog
- Status Bar: Tap the firmware version displayed in the bottom app bar (on tablet and desktop layouts) to open the Firmware Update dialog
Update Process
- Check for Updates: The dialog shows your current firmware version and checks for available updates from Expert Sleepers
- Release Channel: Choose between stable releases or beta firmware if available
- Download: Select the firmware version to download; progress is displayed during the download
- Flash: After downloading, initiate the flashing process; the module will reboot automatically when complete
Platform Notes
macOS (GitHub release): macOS builds are distributed through GitHub Releases, not TestFlight. The macOS version uses an embedded helper application (nt-flash) to perform firmware updates. This helper runs with the necessary permissions to communicate with the USB bootloader.
Linux: Firmware flashing requires elevated privileges. The application uses pkexec to request authorization when needed. Ensure your system has appropriate udev rules installed for USB device access, or run with elevated privileges.
Windows: Firmware updates should work out of the box. If you encounter driver issues, ensure you have the appropriate USB drivers installed for the Disting NT's bootloader mode.
Auto-Bootloader Mode
On firmware 1.15 and above, nt_helper can automatically put the Disting NT into bootloader mode via a SysEx command — no need to navigate the module's menus manually. A confirmation screen is shown before proceeding. For modules running older firmware, the app falls back to manual instructions guiding you through the module's menu.
On the device selection screen, nt_helper probes the connected Disting NT's firmware version before you even connect. If a firmware update is available, the Firmware button appears right on the device selection screen for convenient access.
Safety
- The firmware update process includes verification steps to ensure the integrity of downloaded files
- Downloaded firmware files are automatically cleaned up after successful installation
- The module will not be bricked by a failed update—you can always retry the flash process
In-App Update Checker
On desktop platforms (Windows, macOS, Linux), nt_helper can check for new versions of itself automatically. This feature uses the GitHub Releases API to compare your installed version against the latest available release.
Update Banner
When a new version is available, a small banner appears at the bottom of the editor screen showing the available version number. The banner includes a What's New button and a dismiss button.
Tapping What's New opens a dialog with the release notes and a download button. Dismissing the banner suppresses it for that version — it will not reappear until a newer release is published.
Download and Install
The dialog shows a progress bar during download. After downloading, the installer behaves differently per platform:
- macOS — Extracts the .app bundle and copies it to the install location. Removes the quarantine attribute automatically. Use the GitHub release build for macOS; TestFlight builds are no longer being made.
- Windows — Creates a PowerShell script that waits for the app to exit, copies the update, and relaunches.
- Linux — Extracts and copies files to the app directory and sets executable permissions.
If the app cannot write to its own install location, the update is saved to ~/Downloads and a button is provided to open the folder for manual installation.
You can also manually check for updates from the Settings dialog.
Routing Editor
nt_helper features an interactive Routing Editor that provides a visual, node-based representation of your preset's signal flow. Access it through the overflow menu by selecting Routing Editor, or by tapping the Routing button in the bottom bar.
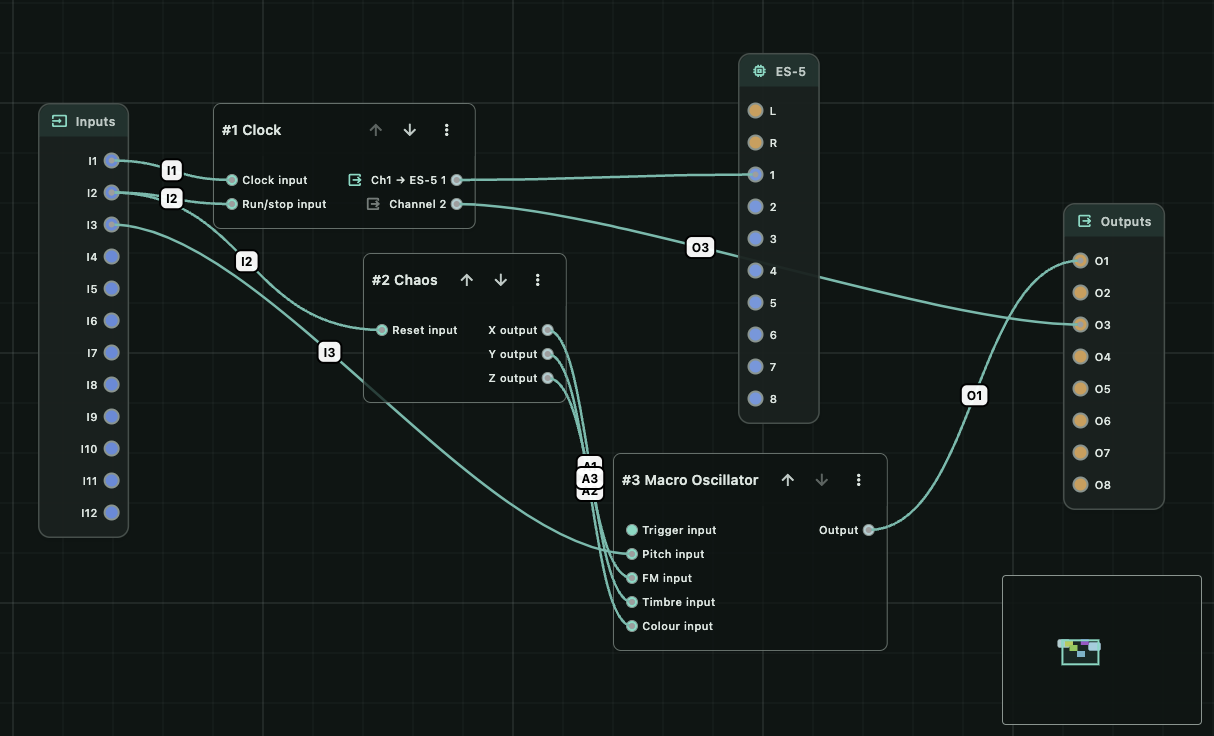
Node Types
The routing editor displays several types of nodes:
- Physical Inputs — The 12 hardware inputs (I1-I12) appear on the left side of the canvas
- Physical Outputs — The 8 hardware outputs (O1-O8) appear on the right side
- Algorithm Nodes — Each algorithm in your preset appears as a node with input ports on the left and output ports on the right
- ES-5 Node — When using algorithms that support ES-5 output (Clock, Euclidean, Clock Multiplier, Clock Divider, Poly CV), an ES-5 node appears with 8 direct output ports
Each algorithm node includes a toolbar with Move Up, Move Down, and Delete buttons for managing the algorithm order.
Creating Connections
To create a connection, drag from an output port to an input port. A temporary line follows your cursor during the drag. The editor automatically assigns an appropriate internal bus based on the connection type:
- Hardware input to algorithm: Uses buses 1-12
- Algorithm to hardware output: Uses buses 13-20
- Algorithm to algorithm: Uses aux buses 21-28 (or 21-64 on firmware 1.15+)
Invalid connections (such as connecting two inputs or two outputs) are prevented with visual feedback.
Connection Display
Connections appear as curved lines between ports. Each connection displays:
- Bus Number — The internal bus used for the connection
- Output Mode — Shows "Add" or "Replace" for connections that support output modes
Click on a connection label to toggle between Add and Replace modes where applicable.
Deleting Connections
- Desktop: Hover over a connection to highlight it, then click to delete
- Mobile: Long-press on a port to see a list of its connections, then select which to delete
Toolbar
The toolbar at the top of the routing editor provides several controls:

- Zoom Dropdown — Select a zoom level from 25% to 200%, or type a custom value
- Zoom In/Out — Buttons to adjust zoom incrementally
- Fit to View — Centers and scales the view to show all nodes
- Reset Layout — Restores the default node arrangement
- Apply Layout — Runs the auto-layout algorithm to optimize node positions
- Optimize AUX Buses — Analyzes AUX bus assignments and proposes merges to consolidate buses. A confirmation dialog shows each proposed merge with individual checkboxes so you can accept or skip each one. During execution, progressive checkmarks track each step as it completes. The tool automatically sets Replace mode on merged sources and includes safety checks to prevent overlapping or out-of-order assignments.
- Screenshot — Opens a menu with options to copy or share the routing diagram
Keyboard Shortcuts (Desktop)
See the Keyboard Shortcuts section above for a consolidated reference. Routing-specific shortcuts include:
- Ctrl/Cmd + Scroll: Zoom in/out
- Ctrl/Cmd + Plus: Zoom in
- Ctrl/Cmd + Minus: Zoom out
- Ctrl/Cmd + 0: Reset zoom to 100%
- Arrow keys: Pan the canvas
- Delete/Backspace: Delete selected connection
- Escape: Cancel connection drag
Screenshot and Export
The screenshot button provides several options for capturing the routing diagram:
- Copy Full Canvas — Copies the entire 5000x5000 canvas to clipboard
- Copy Viewport — Copies only the currently visible area
- Copy Nodes Area — Copies a tight crop around all nodes with minimal margin
- Share (mobile) — Opens the system share sheet to send the image to other apps
Mini-Map
A mini-map in the bottom-right corner shows an overview of the entire canvas. The highlighted rectangle indicates your current viewport position. Click anywhere on the mini-map to jump to that location.
AUX Bus Usage Indicator
A small grid of colored squares in the corner of the routing editor shows how many algorithms are using each AUX bus at a glance.
- Green — 1 algorithm using the bus (normal)
- Amber — 2 algorithms using the bus (shared)
- Red — 3 or more algorithms using the bus (potential conflict)
- Empty — Bus is unused
On firmware below 1.15, the indicator shows a single row of 8 squares for AUX buses 21-28. On firmware 1.15 and above, the grid expands to a 4-row by 11-column layout covering the extended range of AUX buses 21-64.
Hover over a square to see a tooltip with signal-flow details (which algorithms are writing to and reading from that bus). Click a square to focus the routing view on the algorithms connected to that bus.
Navigation
- Pan: Drag on empty canvas space to move around
- Zoom: Use scroll wheel, pinch gesture, or the toolbar controls
- Fit: Click the fit button to automatically center all nodes in view
Accessible Routing List View
For users who rely on screen readers or prefer a non-visual interface, the routing editor provides an accessible list view as an alternative to the canvas.
- Automatic Activation — When a screen reader is detected, the list view activates automatically.
- Manual Toggle — A toggle button is available to switch between the visual canvas and the list view at any time.
- Algorithm Cards — Each algorithm appears as an expandable card showing its slot number, name, input/output count, and active connections. Expand a card to see individual port details and their connections.
- Connection Management — Connections are listed with source, destination, and bus information. You can delete connections directly from the list view, with screen reader announcements confirming each deletion.
Position Persistence
Node positions are saved per preset. When you reopen a preset, the routing editor restores your previous node arrangement. Use the Reset Layout button to return to the default positions.
Perform
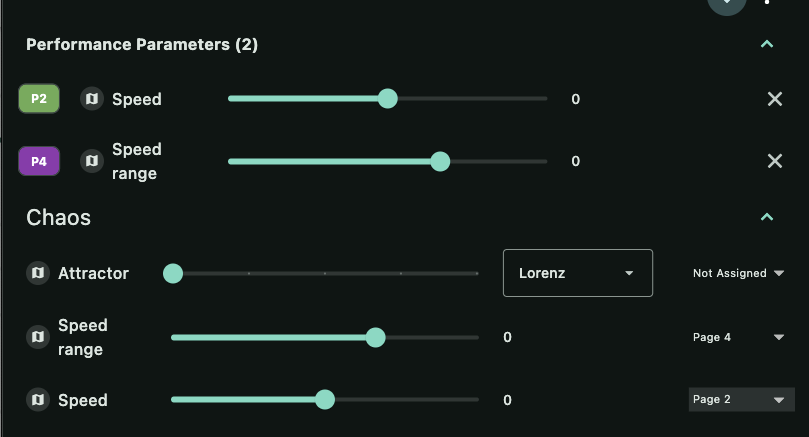
The Perform screen provides quick access to parameters you have assigned to Performance Pages. This mirrors the Performance Pages feature on the Disting NT itself, which allows you to curate key parameters from throughout a preset and present them in a centralized location. Instead of navigating between different algorithms to adjust frequently-used parameters, you can organize them onto up to 30 performance pages.

Performance Pages
The Disting NT supports up to 30 performance pages (P1 through P30). Each page can contain parameters from any algorithm in your preset. In nt_helper, you navigate between pages using the colored badges in the side rail on the left side of the screen. The badges use a rotating color scheme (blue, green, orange, purple, red) to help distinguish pages visually.
Only pages that have parameters assigned to them appear in the navigation rail. Select a page badge to view and edit the parameters on that page.
Each page also displays a hardware preview widget showing the Pot L / Pot C / Pot R layout, matching the physical controls on the Disting NT so you can see at a glance which parameters map to which knobs. You can drag to reorder parameters within a page. Performance page management also works in offline mode — you can assign and rearrange parameters without a connected module.
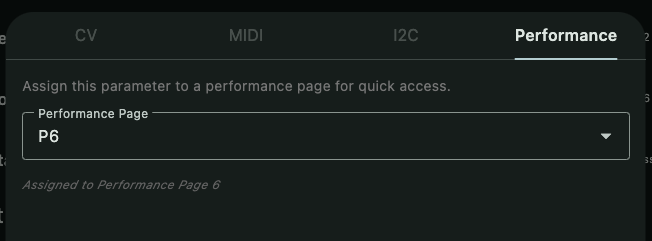
Assigning Parameters to Performance Pages
There are two ways to assign a parameter to a performance page:
From the Algorithm Editor (Desktop): On screens 600px or wider, each parameter row displays a performance page dropdown. Select a page number (1-30) to assign the parameter, or "Not Assigned" to remove it from all performance pages.
From the Mapping Editor: Open the mapping editor for any parameter by tapping its mapping icon. The fourth tab, Performance, contains a dropdown to select which performance page the parameter should appear on.
Performance Parameters Section
When editing an algorithm, a collapsible Performance Parameters section appears showing all parameters from that algorithm currently assigned to any performance page. Each entry displays the page badge (P1, P2, etc.) and includes a remove button to quickly unassign the parameter.
Parameter Polling
The play button in the app bar enables real-time polling of parameter values. When enabled:
- Parameters poll every 100ms while their values are changing
- Parameters slow to polling every 1000ms once stable
- Changes made via MIDI, I2C, or the module's front panel appear in near real-time
CV modulation does not change the underlying parameter values (it applies offsets), so CV changes are not reflected in the Perform sliders.
Polling stops automatically when you leave the Perform screen, or you can stop it manually with the pause button.
Editing Parameters
From the Perform screen you can:
- Adjust parameter values using the sliders
- Open the mapping editor to modify CV, MIDI, I2C, or performance page assignments
- View parameters grouped by their source algorithm
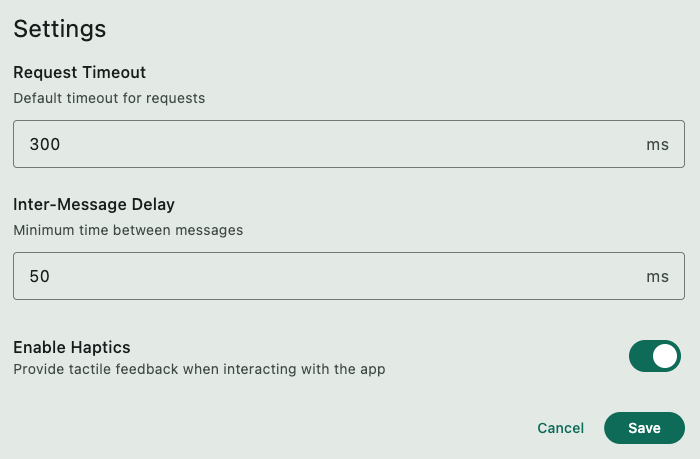
Settings
Displays a dialog where you can change a few settings.
- Request Timeout - When a request to the module takes longer than this,
nt_helperwill retry. Sometimes you may need to increase this for slow devices. If you see infinite Synchronizing increase it a little. - Inter-Message Delay - You may hear small clicks and pops if you make this too small, so give NT a break and keep it above 40ms or so.
- Enable Haptics - The app will provide some haptic feedback when you are moving the sliders. You can disable this here, as it is on by default.
- AI Chat Provider (desktop only) - Select your AI provider (Anthropic or OpenAI), enter your API key, or enable Anthropic subscription authentication for keyless access.
Accessibility
nt_helper includes several accessibility features to support users with different needs.
High Contrast Themes
High contrast light and dark themes are built in. When your operating system's high contrast or increased contrast setting is enabled, nt_helper activates the appropriate high contrast theme automatically. These themes use WCAG-compliant contrast ratios throughout the interface, including the routing editor's connection colors and port indicators.
Screen Reader Support
The application provides semantic labels and live announcements for screen reader users:
- Algorithm tabs, parameter controls, and dialog elements carry descriptive labels.
- State changes (such as selecting an algorithm, adding or deleting a connection, or completing a firmware update) are announced via the platform's accessibility services.
- The Accessible Routing List View provides a fully navigable alternative to the visual routing canvas.
Mapping Editor
The mapping bottom sheet includes a drag handle for easier discovery, a close button in the header, and labeled toggle switches for all mapping modes (CV, MIDI, I2C, Performance).
Support
If you have any problems, or just want to talk, feel free to contact me through the Github Repository for this project. There you can also leave support tickets in the issues section. If you want to talk with me in person, you can do so through the Expert Sleepers Discord.
Privacy Policy
nt_helper does not collect, store, or transmit any user data. The app connects to the internet in two limited cases:
- Update Checks (desktop only) — The app queries the GitHub Releases API (
api.github.com) to check for new versions. No user information is sent; only the latest release metadata is retrieved. - Plugin Gallery Catalog — The Plugin Gallery fetches a catalog of available community plugins. No user information is sent.
- AI Chat (desktop only, optional) — When using the AI Chat Assistant, messages are sent to your configured AI provider (Anthropic or OpenAI). No data is sent unless you explicitly configure and use this feature.
No analytics, telemetry, or personal data of any kind is collected. Your privacy is assured.